
How to Shoot Snowflakes
With Melissa Tokariwsk

About 4 years ago my husband went to an IT convention and brought home many little gadgets like he normally does. Ok, garbage. Basically garbage. This time, one was for me! It was a tiny, clip on Macro lens for my phone. I didn’t try it right away. I had no clue what to use it for. Really, who wants to get that close to anything anyway? Little did I know, within a year I fell in love with macro. Then I couldn’t get close enough to the little things. It snowed, I watched them accumulate on my jacket. I looked closer and they had magnificent shapes! You don’t realize how different they are until you start capturing them. Temperature and humidity are your frienimies. The colder it is, the better they are.

Photography for me, I would see something and think I can do that! And then I tried and tried and tried until I got it right. I had my brand new Tokina 100mm Macro lens and tried that… they were OK but not close enough. And when you cropped in, you ended up with grainy images. I tried my 30mm Macro with a 10x diopter. I could get close but I found them hard to capture. My hands would get cold operating the camera and manual focus. I pulled out that little lens and lo and behold I could get close enough, and I could get them pretty big on the screen on my phone. The lens was cheap and it didn’t take long to break. I went on the hunt for something similar to the free clip-on. I tried many different brands but found the best clarity with the less distortion in the Camkix lens and only $20 on Amazon. The problem with capturing on windows is it can be time-consuming to edit out all those extra flakes and dots. Which can also be very soothing like coloring. https://camkix.com/collections/mobile-phone
I gave up on using my big camera for snowflakes. I used this little lens until I got the iPhone 11 ProMax. I heard about the Shiftcam, an iPhone case that has a sliding lens feature. 10x Macxro, 20x Macro, 4x Zoom, fisheye and a CPL filter for the superwide lens. All built into one case. I don’t find the protection of the case to be that great so I swap out my phone case when I know I’m shooting flakes.

Snowflakes aren’t easy to capture. They take lots of practice, a steady hand and Mother Nature needs to co-operate. I use scarves, mitts, and toques. The fluffier, the better. Those tiny snowflakes can land on a single strand and you will get some amazing depth. With the Camkix and/or the Shiftcam, I was able to focus and operate my phone with my touch gloves and my fingers wouldn’t get cold. A lot of my early snowflake pictures are taken on random car windows. That was always a fun conversation, but they were always impressed when I showed the car owner the picture. I was able to steady my hands on the window and take the picture. Being out in the elements, trying to capture something that easily blows away wasn’t always fun! I spent many times backing the car out of the garage to catch flakes on the windows but I was still in the elements. I then started catching snowflakes on scarves, mitts, and toques. I’d open up the big garage door and stack boxes to the perfect height. Catching my snowflakes on scarves and then bringing them back into the garage, at the edge of the door to shoot. Open door trick right! Great light and I’m out of most of the elements. This was time-consuming to prep and takedown, I wasn’t totally out of the elements with the big garage door open, but it works. Not being completely happy I looked for other options. Catching them outside in the dog-run and then bringing them to the “people size” door. I lean a ladder up against the door and place my scarf on one of the steps. I’m more “inside” than out, but I still get natural light to shoot.

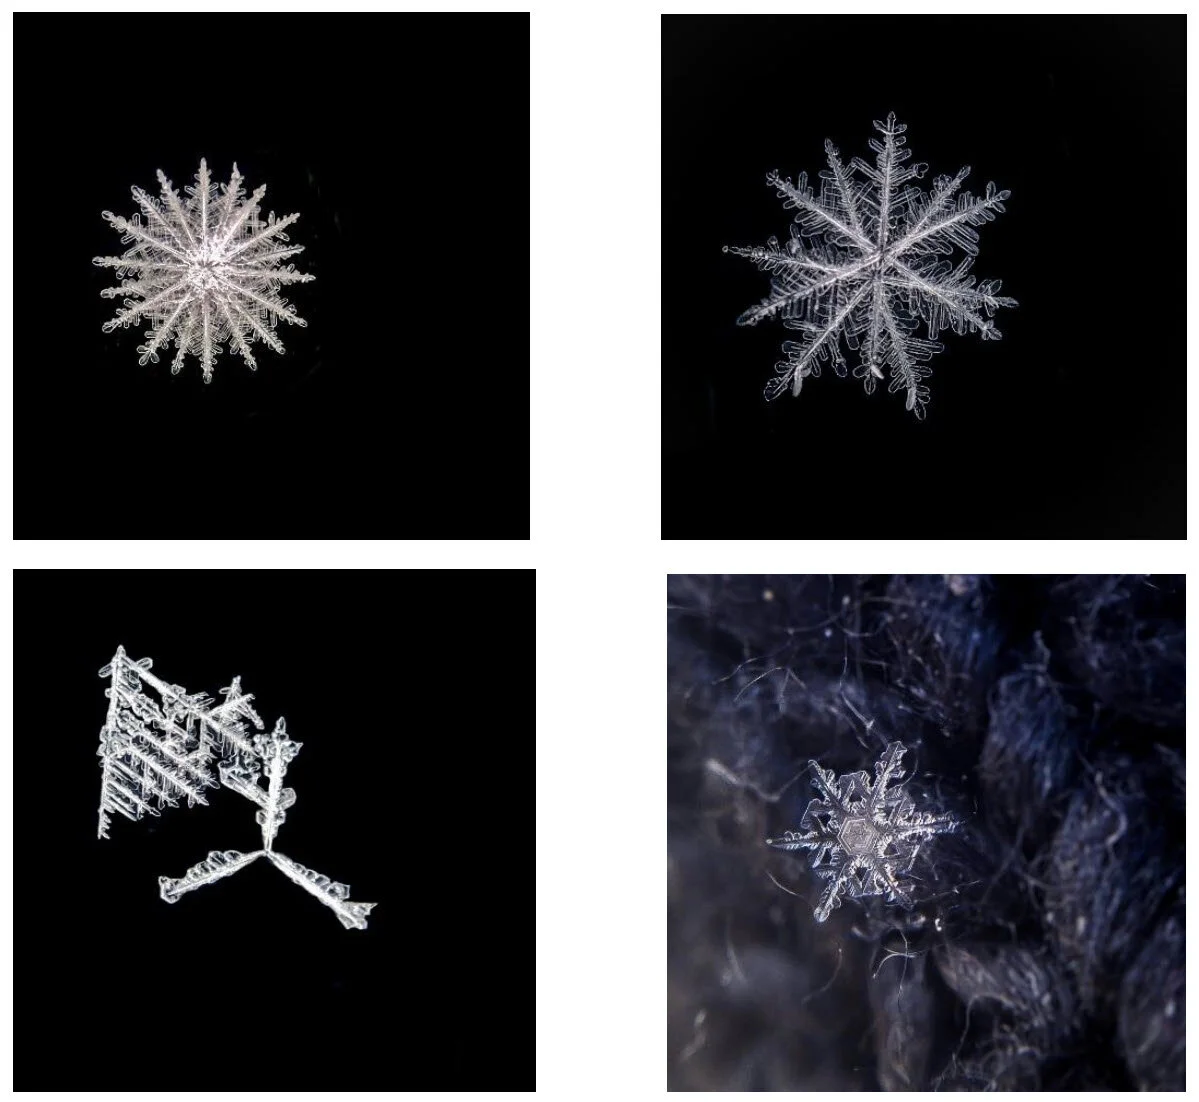
I figured I was ready to try the big girl camera again. It’s been 2 years since I tried my camera and snowflakes. But I needed to get closer. I bought Vivotar 67mm Macro Filters from Amazon for my Lensbaby Velvet 85. When it finally snowed, I screwed on macro filters, +4 and +10 stacked. I was so close and the snowflakes were so big! Now I had 4 options to shoot flakes with, so clearly, a comparison of the lenses was required! None of these images are cropped. This is how close you get with +14 macro filters. All images are edited the same.


When shooting macro, the closer you get to your object, the shallower the depth of field. You’ll also notice camera shake more if doing it handheld. I handhold my camera for everything except long exposure. The camera shake is similar to using a big telephoto lens, fully extended and handheld. I try to capture snowflakes straight on to see the patterns. Sometimes the snowflakes move and you get something else. Or you’re not straight on and the edges fade, aka bokeh. iPhones adjust automatically so no settings required. If using your big camera handheld, adjust your shutter speed for the camera shake. I start at 1/250. You want to capture as many details as possible and when you add in your macro filters, your depth will narrow as well. I set my aperture to F/8 and ISO accordingly. I handhold my camera because it’s easier for me to move the camera around the snowflake instead of trying to get the snowflake in the perfect spot. I can’t say this enough…. You will be extremely close to your snowflakes. I use manual focus with focus peaking. I move my body in and out to gain focus, not adjusting the focus on the lens. I take several captures, but I have never photo stacked them. There is no right or wrong way to capture them. It’s just a preference for me and I hope it helps you.


Snowflakes capture a lot of light, so if they look blown out, don’t panic yet! Once you start doing some adjustments they will improve. And once you get some practice in, you will improve too! I edit in LightRoom, and more specifically LRMobile. I can edit anywhere, it syncs with my computer, and I can post to social media all on my phone. You can use whatever preset you want, or whatever you normally do but when editing my snowflakes, I decrease highlights and increase clarity and texture in the overall picture. I then do a radial filter around the snowflake and slightly increase clarity, texture, and detail again. Small increase amounts are better than one large adjustment. Sometimes you can see color in them and I definitely increase saturation within the snowflake when this happens. A lot of my snowflakes are center-composed or not too far off-center. That is because I don’t want to risk distortion with using the macro filters. I don’t normally crop in a lot but I will square them up. Even though I am shooting on my phone, I am able to print great snowflakes as big as a 5x7. If you’re shooting snowflakes remember to capture the frost too!

What is it about snowflakes? My Instagram goes crazy when I post them. Every time it snows, snowflakes challenge me. They are unique. They are hard to capture. They don’t happen every day. You will run outside to check them, frequently. You will get frustrated as you practice. You will be disappointed in the shapes one day. You will get better and you might get a 2 for 1!

©Melissa Tokariwski https://instagram.com/skahdee?igshid=feq6lmrjwqyq